| ||||
W. Tombling Ltd.
Wembley House
Dozens Bank
West Pinchbeck
Spalding
Lincolnshire
PE11 3ND
U.K.


Installing air distribution ducts
Activair air ducts are quick and easy to install. They can be laid on the floor, under benching or suspended overhead using a duct kit. For optimum air distribution when installing Activair air ducts the following guidelines should be followed:
- Duct runs should cover as much of the area as possible
- Keep duct runs as short and straight as practical
- Use as few metal elbows and tees as possible
- Fit air straighteners after the fan, and elbows, tees etc. if the ducts flap
For further information see designing a duct system.
Typical air duct layouts
The following diagrams illustrate the most popular layouts for air ducts suspended overhead:
| A simple two duct design. Air distribution is relatively efficient and the installation cost is low. This design is only suitable for narrow buildings |
 |
| Most Activair air duct systems are based on this design. This design is more expensive to install than above, but the air distribution is superior. This system combines plain and perforated Activair air ducts with metal ductwork |
 |
| This layout provides the most efficient air distribution. A metal duct runs down the centre of the building from which the perforated air ducts extend. The perforated air ducts are short but cover the whole area. This design is used in cool rooms where air distribution must be carefully controlled |
 |
Activair duct kit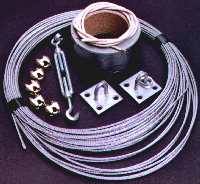
Because Activair air ducts weigh less than 0.5kg/m they are often suspended overhead.
To speed up installation we supply two ducts kits containing the basic components required to suspend one
air duct. Using Activair duct kits even unskilled workers, can install hundreds of meters of Activair air ducts per day.
Two duct kits are available:
Duct kit A is used for air ducts upto 75ft. (23m) and contains one wire rope tensioner.
Duct kit B is for air ducts upto 150ft. (46m) and contains two wire rope tensioners.
Duct Kit A for ducts upto 75ft. (23m) |
Duct kit B for ducts upto 150ft. (46m) |
| 2 - end brackets 1 - wire tensioner 5 - wire grips 2 - wire thimbles 1 - galvanised steel wire rope 1 - roll of duct tape or metal strap 1 - instruction leaflet |
2 - end brackets 2 - wire tensioners 5 - wire grips 2 - wire thimbles 1 - galvanised steel wire rope 1 - roll of duct tape or metal strap 1 - instruction leaflet |
It is the responsibility of the customer to provide any additional fixings required.
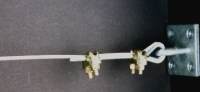
Duct kit installation
| 1) Ensure there is sufficient head clearance to allow the
deflated air duct to hang down from the suspension wire. Fix the end brackets to the walls
(fixing screws not supplied) making sure the wire is level and resting on the top of the
air outlet. 2) Fit a thimble and two wire grips at each end. The first grip must be immediately next to the thimble. The second grip must be at least 50mm from the first. Tighten to approximately 3N.m 3) Fix one wire grip to the top of the air outlet. |
 |
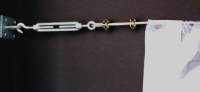
| 4) Pass the suspension wire through the air duct and grip on
the air outlet making sure the holes in the duct are closer together near the air
inlet (fan) end. Stretch the wire between the two wall brackets 5) Duct kit A Make sure the wire tensioner is fully open and fitted at the end furthest from the air inlet (fan end). Duct kit B Make sure the wire tensioners are fully open, and attach one to each end of the suspension wire. 6) Tighten the tensioner(s) to remove the slack from the suspension wire |
 |
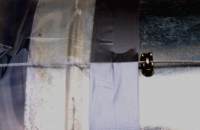
| 7) Pass 6in. (150mm) of air duct over the air outlet,
and secure it using either duct tape or an expanding duct clip 6) Trim the far end of the air duct to length allowing 3ft. between the duct and end wall. The air duct must not be shortened by more than 10% of its overall length, if necessary order a new air duct of the correct length |
 |
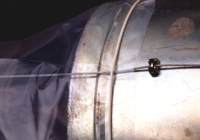
| 7) Seal the end of the air duct. Use an impulse heat
sealer, or fold the air duct over several times and seal it with duct tape. 8) If the air duct sags fix supports between the roof and suspension wire. (Available separately). 9) Strengthen the suspension points with duct tape to prevent tearing |
 |
Commissioning the air duct system
As the air duct system inflates listen for loud ‘popping’ sounds caused by the air ducts inflating too quickly. If necessary fit a slow start circuit to the fan.Check the air duct does not chafe against obstructions as it inflates. If necessary re-route it.
Inspect the air ducts for flapping, caused by excessive air turbulence inside the air ducts. Fit air straighteners, after elbows, tee’s, etc.
If the air turbulence is still a problem recheck the duct system design making sure the air pressure and velocity are within the guidelines.
More information on Activair air ducts
See designing an Activair duct system, and the benefits of polythene air ducts
Click on the icon, for a printer friendly data sheet.
![]()
If you found this page useful, please take a moment
to tell a friend or colleague about it.
Copyright © 2003/6, W. Tombling Ltd.